
This guide verifies visible listing information and prepares a later QC comparison. Seller descriptions are not independent proof of fibre content, durability, fit or authenticity.
Define what ‘wear’ means for the search
Searches for USFans wear can refer to hoodies, sweatshirts, tees, jackets, pants or jerseys. Begin by defining the garment type and use case. A relaxed hoodie, fitted football shirt and outer jacket need different measurements and construction checks. Record the preferred silhouette, layering plan and two or three non-negotiable dimensions before browsing.
This prevents category pages from becoming an unfiltered pile of clothing. It also turns a broad keyword into useful decisions. The goal is not to announce that an item is ‘true to size’; it is to find a listing that provides enough information for the buyer to compare with clothing that already fits.
Measure a garment you already own
Lay a similar garment flat without stretching it. Measure chest width, body length, shoulder width and sleeve length using the same endpoints shown by the seller. For pants, add waist, rise, thigh and inseam where relevant. Write down whether each figure is a flat width or full circumference. Confusing those two formats can double the apparent size.
Compare garment measurements rather than relying on S, M or L. Labels vary between sellers and product lines. Allow for the fit you want and for measurement tolerance, but do not invent an exact tolerance when the seller does not publish one. If the listing lacks the one dimension that decides fit, request clarification or choose a better documented candidate.
Read fabric weight without overselling it
Some clothing listings publish grams per square metre, total garment weight or descriptive terms such as heavy, brushed or summer weight. These are not interchangeable. GSM describes fabric mass per area, while total garment weight also depends on size, panels, lining and hardware. A heavier number does not automatically mean better fabric or warmer performance.
Record the exact metric and attribute it to the seller. If only a marketing phrase is present, treat the fabric weight as unknown. Photographs may suggest texture or thickness but cannot prove composition. A useful wear guide states what can be compared and leaves unsupported performance claims out.
Inspect construction evidence
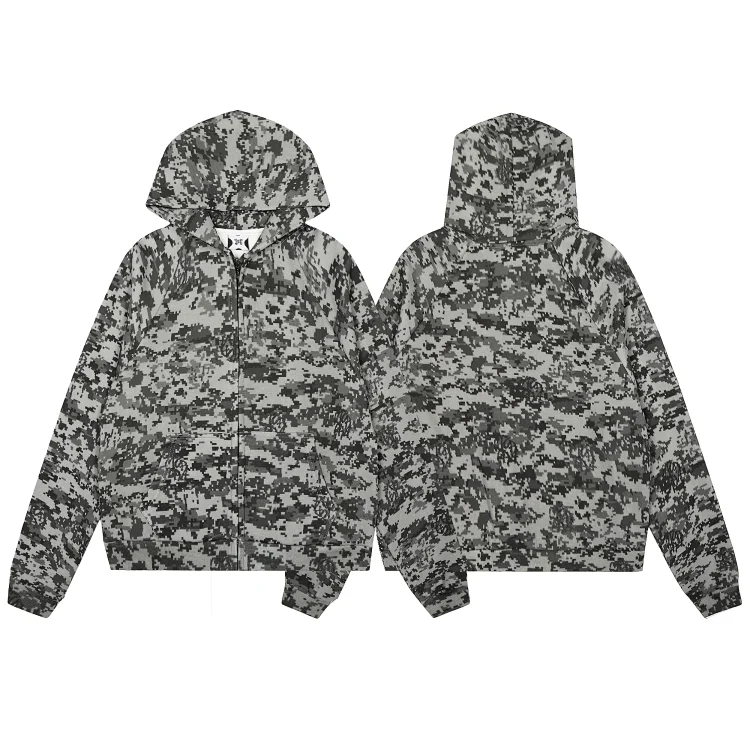
Use product images to inspect seams, ribbing, zipper type, pocket placement, hood shape, lining, cuffs and hem. For printed items, compare graphic scale and location against garment seams. For embroidery, look at edge definition and backing only when shown. Mixed images with different drawstrings, labels or pocket shapes may indicate several versions sharing one listing.
Separate a seller's reference photos from later warehouse photos. The listing helps choose an option; the warehouse set shows the received unit from limited angles. Save key listing images so that a visible change can be identified later. Do not call either stage an authenticity test.
Confirm colour and variant language
Colour names translated from Chinese can be ambiguous, and one option may represent a set, lining or seasonal version rather than a simple colour. Click each thumbnail and watch which image, size range and price changes. Record the exact option text instead of rewriting it into a more confident label.
If two colour options use the same image, consider colour evidence weak. Screens and lighting can shift tone, so focus on large differences and on whether the option matches the intended family. A buyer who needs an exact shade should prefer listings with multiple consistent photos and clear option naming.
Use seller and after-sales signals
A well-documented garment listing should show a coherent option grid, size information, seller identity and understandable domestic delivery or after-sales terms. None of these guarantees quality, but together they make the purchase easier to audit. Look for contradictions between title, images and option text before looking at popularity numbers.
Customer comments can reveal recurring fit language, but they remain individual reports. Give more weight to comments that state height, weight, chosen size or garment measurement, while recognising that body shape and fit preference differ. Do not convert one review into a universal recommendation.
Compare fit rather than chasing a label
Translate the intended silhouette into numbers. A relaxed fit may need additional chest ease, while a cropped garment can be wide without being long. Layering under a jacket changes the useful chest and sleeve range. These are personal fit decisions, so explain the comparison method instead of publishing one size as correct for everyone.
When two candidates use different charts, build a small comparison with the same measurements. Do not compare one seller's body recommendation with another seller's garment width as if they were equivalent. If the page supplies only a label and no method, that listing has weaker evidence and should score lower.
Keep a fabric evidence record
Save the seller's composition wording, weight metric, lining description and close-up photographs together. Note the date and selected colour, because fabric can differ by version. If a later warehouse photograph appears thinner or uses a visibly different lining, the record makes the question specific instead of relying on memory.
Do not add sensory claims such as soft, breathable or warm unless the source explicitly describes them, and keep those descriptions attributed. A photograph cannot measure comfort. The most trustworthy clothing content explains how evidence was collected and what remains unknown.
Build a useful clothing comparison table
A practical comparison needs only consistent fields: garment type, intended fit, selected size, chest, length, shoulder, sleeve, fabric wording, lining, option price, domestic delivery and date checked. Leave a cell blank when the listing does not provide the answer. A blank is more honest than a guessed specification and makes weaker listings immediately visible.
Keep seller claims and measured fields in separate columns. This lets readers filter for the evidence they value and helps editors recheck a changed page quickly. The table should lead to the exact live option, while the article explains how to judge it.
Prepare a clothing QC checklist
Before purchase, write the later photo checklist: selected colour and size label, chest and length evidence if available, front and back design, cuffs, zipper, pockets, stains, tears and included accessories. The USFans public workflow describes inspection and real photos after warehouse arrival, so the saved checklist makes that stage more purposeful.
Ask for additional evidence only when a missing view would change the decision. A specific request such as chest width laid flat is better than ‘more photos’. Remember that pictures cannot prove fibre percentages, long-term shrinkage or comfort. Keep the conclusion limited to visible evidence.
Choose the best-documented listing
Score candidates for complete option identity, comparable measurements, consistent images, specific fabric information, visible construction and clear seller terms. Penalise missing or contradictory data. The winner may not be the cheapest product; it is the listing that lets the buyer understand what is being ordered and check the result later.
Reopen the page before payment, save the chosen option and keep the record until delivery. USFans wear discovery becomes more useful when it replaces label guessing with measurements and separates seller claims from visible facts. That method improves both purchase confidence and the quality of future spreadsheet updates.
Work through a measurement comparison
Use an illustrative T-shirt reference with a flat chest width of 54 cm and a body length of 70 cm. A candidate listed at 58 cm and 68 cm would be wider and shorter if both garments are measured in the same way. That comparison describes shape; it does not recommend a size or prove how the fabric will behave. Keep the seller chart and measuring points alongside the example.
For trousers, separate flat waist width, circumference, rise and inseam. For jackets, use a reference that fits over the layers you intend to wear. For shoes, distinguish foot length, insole length and outsole length. These are different measurements; none should be silently substituted for another. If the chart lacks a definition, ask for one rather than inventing a universal conversion.